Trước tiên để cái đặt Nextcloud chúng ta phải cài đặt các thành phần LEMP Stack
Mục lục
Cài đặt NGINX
Trước tiên để cài đặt NGINX bản mới nhất các bạn cần thêm repository như sau:
root@systuts:~# vi /etc/yum.repo.d/nginx.repo
Copy đoạn sau vào file nginx.repo và Save lại
[nginx-stable]
name=nginx stable repo
baseurl=http://nginx.org/packages/centos/$releasever/$basearch/
gpgcheck=1
enabled=1
gpgkey=https://nginx.org/keys/nginx_signing.key
module_hotfixes=true
Sau đó tiến hành cài đặt NGINX
root@systuts:~# yum install nginx -y
Sau khi cài đặt xong chúng ta tiến hành khởi động NGINX:
root@systuts:~# systemctl enable nginx
root@systuts:~# systemctl start nginx
Mở port web 80 và 443 trên firewalld để có thể truy cập được Website từ Inetrnet:
root@systuts:~# firewall-cmd --permanent --add-service=http
root@systuts:~# firewall-cmd --permanent --add-service=https
# Reload lại firewalld
root@systuts:~# firewall-cmd --reload
Cài đặt MariaDB Server
Tương tự như cài NGINX, chúng ta cần tạo và thêm repository MariaDB
root@systuts:~# vi /etc/yum.repo.d/mariadb.repo
# MariaDB 10.5 CentOS repository list - created 2021-05-30 03:23 UTC
# http://downloads.mariadb.org/mariadb/repositories/
[mariadb]
name = MariaDB
baseurl = http://yum.mariadb.org/10.5/centos7-amd64
gpgkey=https://yum.mariadb.org/RPM-GPG-KEY-MariaDB
gpgcheck=1
Sau đó tiến hành cài đặt và khởi động MariaDB Server:
root@systuts:~# yum install MariaDB-server MariaDB-client
Khởi động MariaDB Server
root@systuts:~# systemctl enable mariadb
root@systuts:~# systemctl start mariadb
Thiết lập bảo mật MariaDB Server:
root@systuts:~# mysql_secure_installation
NOTE: RUNNING ALL PARTS OF THIS SCRIPT IS RECOMMENDED FOR ALL MariaDB
SERVERS IN PRODUCTION USE! PLEASE READ EACH STEP CAREFULLY!
In order to log into MariaDB to secure it, we'll need the current
password for the root user. If you've just installed MariaDB, and
you haven't set the root password yet, the password will be blank,
so you should just press enter here.
Enter current password for root (enter for none):
OK, successfully used password, moving on…
Setting the root password ensures that nobody can log into the MariaDB
root user without the proper authorisation.
Set root password? [Y/n] Y
New password:            #Enter your password
Re-enter new password:             #Re-enter password
Password updated successfully!
Reloading privilege tables..
… Success!
By default, a MariaDB installation has an anonymous user, allowing anyone
to log into MariaDB without having to have a user account created for
them. This is intended only for testing, and to make the installation
go a bit smoother. You should remove them before moving into a
production environment.
Remove anonymous users? [Y/n] Y
… Success!
Normally, root should only be allowed to connect from 'localhost'. This
ensures that someone cannot guess at the root password from the network.
Disallow root login remotely? [Y/n] Y
… Success!
By default, MariaDB comes with a database named 'test' that anyone can
access. This is also intended only for testing, and should be removed
before moving into a production environment.
Remove test database and access to it? [Y/n] Y
Dropping test database…
… Success!
Removing privileges on test database…
… Success!
Reloading the privilege tables will ensure that all changes made so far
will take effect immediately.
Reload privilege tables now? [Y/n] Y
… Success!
Cleaning up…
All done! If you've completed all of the above steps, your MariaDB
installation should now be secure.
Thanks for using MariaDB!
Cài đặt PHP-FPM
root@systuts:~# yum install unzip epel-release https://rpms.remirepo.net/enterprise/remi-release-7.rpm yum-utils -y
Khởi động MariaDB Server
root@systuts:~# systemctl enable mariadb
root@systuts:~# systemctl start mariadb
Giả sử chúng ta cần cài đặt php 7.4 chúng ta cần bật repo như sau:
root@systuts:~# yum-config-manager --enable remi-php74
Cài đặt PHP 7.4
root@systuts:~# yum install php php-fpm php-curl php-common php-gd php-json php-mbstring php-mysqlnd php-xml php-xmlrpc php-opcache php-mysql php-cli php-mcrypt php-zip -y
Cấu hình PHP-FPM
root@systuts:~# vi /etc/php-fpm.d/www.conf
Tìm các giá trị sau và sửa:
user = apache         		      user = nginx
group = apache         		      group = nginx
listen = 127.0.0.1:9000    =====>     listen = /var/run/php_fpm.sock
;listen.owner = nobody         	      listen.owner = nginx
;listen.group = nobody        	      listen.group = nginx
;listen.mode = 0660        	      listen.mode = 0660
Khởi động PHP-FPM
root@systuts:~# systemctl enable php-fpm
root@systuts:~# systemctl start php-fpm
Cài đặt Nextcloud
Tải và giải nén phiên bản mới nhất của NextCloud Server
root@systuts:~# wget https://download.nextcloud.com/server/releases/nextcloud-20.0.2.zip
root@systuts:~# unzip nextcloud-20.0.2.zip
root@systuts:~# mv nextcloud /var/www/html/nextcloud
root@systuts:~# chown -R nginx.nginx /var/www/html/nextcloud
Tạo virtual host trên NGINX
root@systuts:~# vi /etc/nginx/conf.d/nextcloud.conf
upstream php-handler {
    server unix:/var/run/php_fpm.sock;
}

server {
    listen 80;
    server_name [yourdomain or IP address];

    # Add headers to serve security related headers
    # Before enabling Strict-Transport-Security headers please read into this
    # topic first.
    #add_header Strict-Transport-Security "max-age=15768000; includeSubDomains; preload;";
    #
    # WARNING: Only add the preload option once you read about
    # the consequences in https://hstspreload.org/. This option
    # will add the domain to a hardcoded list that is shipped
    # in all major browsers and getting removed from this list
    # could take several months.
    add_header X-Content-Type-Options nosniff;
    add_header X-XSS-Protection "1; mode=block";
    add_header X-Robots-Tag none;
    add_header X-Download-Options noopen;
    add_header X-Permitted-Cross-Domain-Policies none;
    add_header Referrer-Policy no-referrer;

    # Remove X-Powered-By, which is an information leak
    fastcgi_hide_header X-Powered-By;

    # Path to the root of your installation
    root /usr/local/nginx/html/nextcloud;

    location = /robots.txt {
        allow all;
        log_not_found off;
        access_log off;
    }

    # The following 2 rules are only needed for the user_webfinger app.
    # Uncomment it if you're planning to use this app.
    #rewrite ^/.well-known/host-meta /public.php?service=host-meta last;
    #rewrite ^/.well-known/host-meta.json /public.php?service=host-meta-json last;

    # The following rule is only needed for the Social app.
    # Uncomment it if you're planning to use this app.
    #rewrite ^/.well-known/webfinger /public.php?service=webfinger last;

    location = /.well-known/carddav {
      return 301 $scheme://$host:$server_port/remote.php/dav;
    }
    location = /.well-known/caldav {
      return 301 $scheme://$host:$server_port/remote.php/dav;
    }

    # set max upload size
    client_max_body_size 512M;
    fastcgi_buffers 64 4K;

    # Enable gzip but do not remove ETag headers
    gzip on;
    gzip_vary on;
    gzip_comp_level 4;
    gzip_min_length 256;
    gzip_proxied expired no-cache no-store private no_last_modified no_etag auth;
    gzip_types application/atom+xml application/javascript application/json application/ld+json application/manifest+json application/rss+xml application/vnd.geo+json application/vnd.ms-fontobject application/x-font-ttf application/x-web-app-manifest+json application/xhtml+xml application/xml font/opentype image/bmp image/svg+xml image/x-icon text/cache-manifest text/css text/plain text/vcard text/vnd.rim.location.xloc text/vtt text/x-component text/x-cross-domain-policy;

    # Uncomment if your server is build with the ngx_pagespeed module
    # This module is currently not supported.
    #pagespeed off;

    location / {
        rewrite ^ /index.php;
    }

    location ~ ^\/(?:build|tests|config|lib|3rdparty|templates|data)\/ {
        deny all;
    }
    location ~ ^\/(?:\.|autotest|occ|issue|indie|db_|console) {
        deny all;
    }

    location ~ ^\/(?:index|remote|public|cron|core\/ajax\/update|status|ocs\/v[12]|updater\/.+|oc[ms]-provider\/.+)\.php(?:$|\/) {
        fastcgi_split_path_info ^(.+?\.php)(\/.*|)$;
        set $path_info $fastcgi_path_info;
        try_files $fastcgi_script_name =404;
        include fastcgi_params;
        fastcgi_param SCRIPT_FILENAME $document_root$fastcgi_script_name;
        fastcgi_param PATH_INFO $path_info;
        #fastcgi_param HTTPS on;
        # Avoid sending the security headers twice
        fastcgi_param modHeadersAvailable true;
        # Enable pretty urls
        fastcgi_param front_controller_active true;
        fastcgi_pass php-handler;
        fastcgi_intercept_errors on;
        fastcgi_request_buffering off;
    }

    location ~ ^\/(?:updater|oc[ms]-provider)(?:$|\/) {
        try_files $uri/ =404;
        index index.php;
    }

    # Adding the cache control header for js, css and map files
    # Make sure it is BELOW the PHP block
    location ~ \.(?:css|js|woff2?|svg|gif|map)$ {
        try_files $uri /index.php$request_uri;
        add_header Cache-Control "public, max-age=15778463";
        # Add headers to serve security related headers (It is intended to
        # have those duplicated to the ones above)
        # Before enabling Strict-Transport-Security headers please read into
        # this topic first.
        #add_header Strict-Transport-Security "max-age=15768000; includeSubDomains; preload;";
        #
        # WARNING: Only add the preload option once you read about
        # the consequences in https://hstspreload.org/. This option
        # will add the domain to a hardcoded list that is shipped
        # in all major browsers and getting removed from this list
        # could take several months.
        add_header X-Content-Type-Options nosniff;
        add_header X-XSS-Protection "1; mode=block";
        add_header X-Robots-Tag none;
        add_header X-Download-Options noopen;
        add_header X-Permitted-Cross-Domain-Policies none;
        add_header Referrer-Policy no-referrer;

        # Optional: Don't log access to assets
        access_log off;
    }

    location ~ \.(?:png|html|ttf|ico|jpg|jpeg|bcmap)$ {
        try_files $uri /index.php$request_uri;
        # Optional: Don't log access to other assets
        access_log off;
    }
}
Khởi động lại dịch vụ NGINX:
root@systuts:~# systemctl restart nginx
Tạo database cho Nextcloud
Login vào MariaDB Server
root@systuts:~# mysql -u -root -p
Welcome to the MariaDB monitor.  Commands end with ; or \g.
Your MariaDB connection id is 198580
Server version: 10.5.9-MariaDB MariaDB Server

Copyright (c) 2000, 2018, Oracle, MariaDB Corporation Ab and others.

Type 'help;' or '\h' for help. Type '\c' to clear the current input statement.

MariaDB [(none)]>
Chạy các lệnh sau để tạo database, chú ý thiết lập username và password của bạn.
CREATE USER 'username'@'localhost' IDENTIFIED BY 'password';
CREATE DATABASE IF NOT EXISTS nextcloud CHARACTER SET utf8mb4 COLLATE utf8mb4_general_ci;
GRANT ALL PRIVILEGES on nextcloud.* to 'username'@'localhost'; FLUSH privileges;
exit;
Thiếp lập Nextcloud
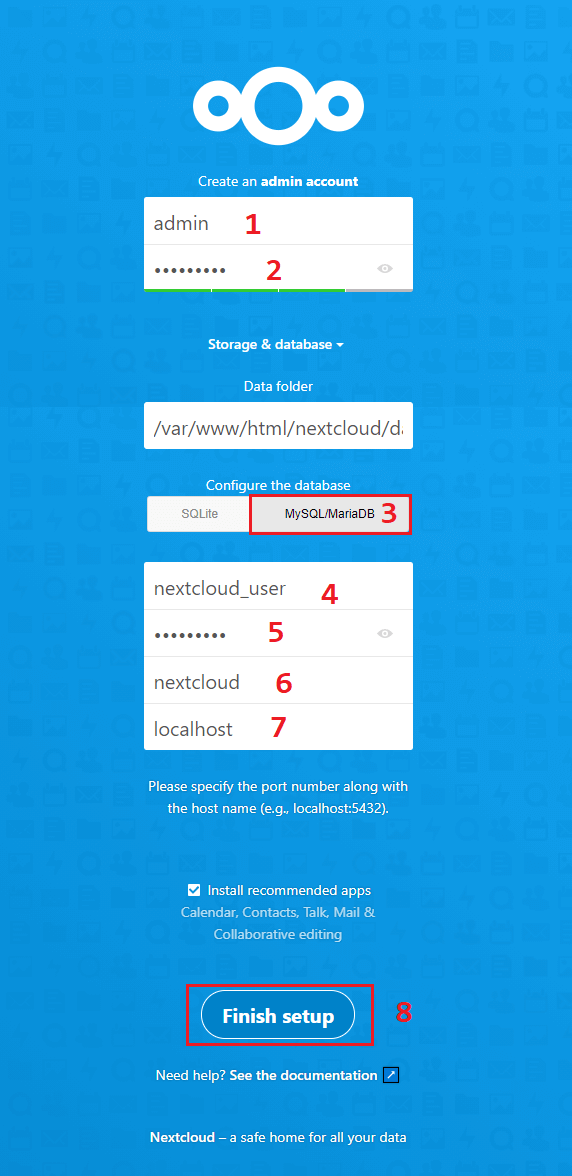
Mở trình duyệt và nhập vào địa chỉ IP hoặc tên miền của bạn, hiển thị ra trình cài đặt Nextcloud các bạn cần điền các thông tin để thiết lập.

Chúc các bạn thành công.